Anita’s Wonderland | Overview Anita’s Lined Zippered Bags Tutorial
A B
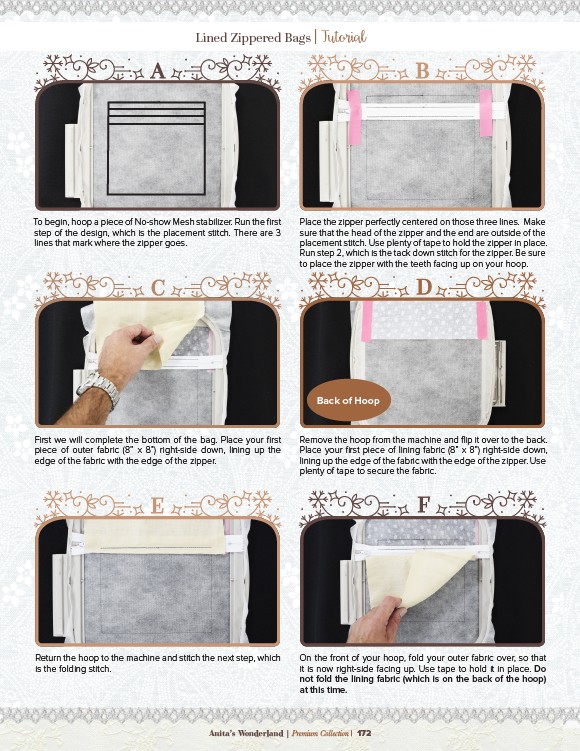
Place the zipper perfectly centered on those three lines. Make
sure that the head of the zipper and the end are outside of the
placement stitch. Use plenty of tape to hold the zipper in place.
Run step 2, which is the tack down stitch for the zipper. Be sure
to place the zipper with the teeth facing up on your hoop.
Back of Hoop
Remove the hoop from the machine and flip it over to the back.
Place your first piece of lining fabric (8” x 8”) right-side down,
lining up the edge of the fabric with the edge of the zipper. Use
plenty of tape to secure the fabric.
On the front of your hoop, fold your outer fabric over, so that
it is now right-side facing up. Use tape to hold it in place. Do
not fold the lining fabric (which is on the back of the hoop)
at this time.
To begin, hoop a piece of No-show Mesh stabilizer. Run the first
step of the design, which is the placement stitch. There are 3
lines that mark where the zipper goes.
C
First we will complete the bottom of the bag. Place your first
piece of outer fabric (8” x 8”) right-side down, lining up the
edge of the fabric with the edge of the zipper.
Return the hoop to the machine and stitch the next step, which
is the folding stitch.
Wonderland | Premium Collection | 172
D
E F