CREATING YOUR DOLL BODY
STEP BY STEP INSTRUCTIONS
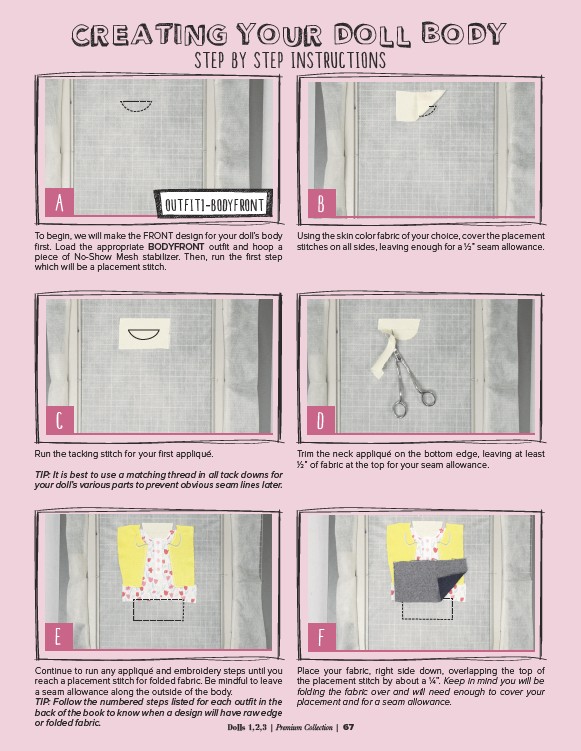
To begin, we will make the FRONT design for your doll’s body
first. Load the appropriate BODYFRONT outfit and hoop a
piece of No-Show Mesh stabilizer. Then, run the first step
which will be a placement stitch.
B
Using the skin color fabric of your choice, cover the placement
stitches on all sides, leaving enough for a 1⁄2” seam allowance.
C D
Run the tacking stitch for your first appliqué.
TIP: It is best to use a matching thread in all tack downs for
your doll’s various parts to prevent obvious seam lines later.
Trim the neck appliqué on the bottom edge, leaving at least
1⁄2” of fabric at the top for your seam allowance.
E F
Continue to run any appliqué and embroidery steps until you
reach a placement stitch for folded fabric. Be mindful to leave
a seam allowance along the outside of the body.
TIP: Follow the numbered steps listed for each outfit in the
back of the book to know when a design will have raw edge
or folded fabric.
Place your fabric, right side down, overlapping the top of
the placement stitch by about a 1⁄4”. Keep in mind you will be
folding the fabric over and will need enough to cover your
placement and for a seam allowance.
A OUTFIT1-BODYFRONT
Dolls 1,2,3 | Premium Collection | 67