STEPS | ALL ACCESS | 273
6. 489 - main element outlines and details
7. Placement Stitch - then place folded
fabric 1
8. Folding Stitch - then fold folded fabric 1
9. Tacking Stitch - do not trim
10. Placement Stitch - then place folded
fabric 2
11. Folding Stitch - then fold folded fabric 2
12. Tacking Stitch - do not trim
13. Placement Stitch - then place folded
fabric 3
14. Folding Stitch - then fold folded fabric 3
15. Tacking Stitch - do not trim
16. Placement Stitch - then place folded
fabric 4
17. Folding Stitch - then fold folded fabric 4
18. Tacking Stitch - do not trim
OPW3
AA Size - 9.0” x 9.0” (Stitches - 21230)
A Size - 7.7” x 7.7” (Stitches - 18854)
B Size - 6.7” x 6.7” (Stitches - 17046)
C Size - 5.8” x 5.8” (Stitches - 15445)
D Size - 4.7” x 4.7” (Stitches - 13494)
1. Squaring Stitch - then place batting
2. Tacking Stitch - then trim batting
3. Placement Stitch - then place printed
fabric background
4. Printed Fabric Tacking Stitch
5. 4613 - decorative background motifs
and swirls
6. 489 - main element outlines and details
7. Placement Stitch - then place folded
fabric 1
8. Folding Stitch - then fold folded fabric 1
9. Tacking Stitch - do not trim
10. Placement Stitch - then place folded
fabric 2
11. Folding Stitch - then fold folded fabric 2
12. Tacking Stitch - do not trim
13. Placement Stitch - then place folded
fabric 3
14. Folding Stitch - then fold folded fabric 3
15. Tacking Stitch - do not trim
16. Placement Stitch - then place folded
fabric 4
17. Folding Stitch - then fold folded fabric 4
18. Tacking Stitch - do not trim
OPW4
AA Size - 9.0” x 9.0” (Stitches - 19251)
A Size - 7.7” x 7.7” (Stitches - 17148)
B Size - 6.7” x 6.7” (Stitches - 15613)
C Size - 5.8” x 5.8” (Stitches - 13992)
D Size - 4.7” x 4.7” (Stitches - 12262)
1. Squaring Stitch - then place batting
2. Tacking Stitch - then trim batting
3. Placement Stitch - then place printed
fabric background
4. Printed Fabric Tacking Stitch
5. 4613 - decorative background motifs
and swirls
6. 489 - main element outlines and details
7. Placement Stitch - then place folded
fabric 1
8. Folding Stitch - then fold folded fabric 1
9. Tacking Stitch - do not trim
10. Placement Stitch - then place folded
fabric 2
11. Folding Stitch - then fold folded fabric 2
12. Tacking Stitch - do not trim
13. Placement Stitch - then place folded
fabric 3
14. Folding Stitch - then fold folded fabric 3
15. Tacking Stitch - do not trim
16. Placement Stitch - then place folded
fabric 4
17. Folding Stitch - then fold folded fabric 4
18. Tacking Stitch - do not trim
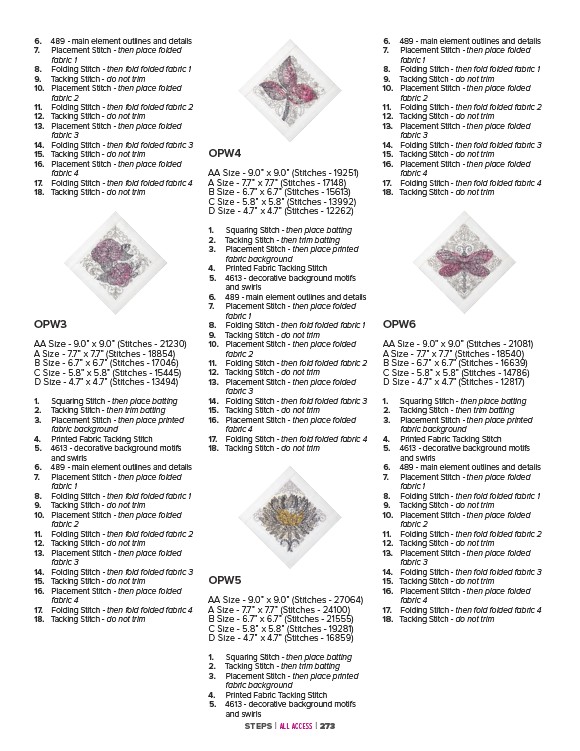
OPW5
AA Size - 9.0” x 9.0” (Stitches - 27064)
A Size - 7.7” x 7.7” (Stitches - 24100)
B Size - 6.7” x 6.7” (Stitches - 21555)
C Size - 5.8” x 5.8” (Stitches - 19281)
D Size - 4.7” x 4.7” (Stitches - 16859)
1. Squaring Stitch - then place batting
2. Tacking Stitch - then trim batting
3. Placement Stitch - then place printed
fabric background
4. Printed Fabric Tacking Stitch
5. 4613 - decorative background motifs
and swirls
6. 489 - main element outlines and details
7. Placement Stitch - then place folded
fabric 1
8. Folding Stitch - then fold folded fabric 1
9. Tacking Stitch - do not trim
10. Placement Stitch - then place folded
fabric 2
11. Folding Stitch - then fold folded fabric 2
12. Tacking Stitch - do not trim
13. Placement Stitch - then place folded
fabric 3
14. Folding Stitch - then fold folded fabric 3
15. Tacking Stitch - do not trim
16. Placement Stitch - then place folded
fabric 4
17. Folding Stitch - then fold folded fabric 4
18. Tacking Stitch - do not trim
OPW6
AA Size - 9.0” x 9.0” (Stitches - 21081)
A Size - 7.7” x 7.7” (Stitches - 18540)
B Size - 6.7” x 6.7” (Stitches - 16639)
C Size - 5.8” x 5.8” (Stitches - 14786)
D Size - 4.7” x 4.7” (Stitches - 12817)
1. Squaring Stitch - then place batting
2. Tacking Stitch - then trim batting
3. Placement Stitch - then place printed
fabric background
4. Printed Fabric Tacking Stitch
5. 4613 - decorative background motifs
and swirls
6. 489 - main element outlines and details
7. Placement Stitch - then place folded
fabric 1
8. Folding Stitch - then fold folded fabric 1
9. Tacking Stitch - do not trim
10. Placement Stitch - then place folded
fabric 2
11. Folding Stitch - then fold folded fabric 2
12. Tacking Stitch - do not trim
13. Placement Stitch - then place folded
fabric 3
14. Folding Stitch - then fold folded fabric 3
15. Tacking Stitch - do not trim
16. Placement Stitch - then place folded
fabric 4
17. Folding Stitch - then fold folded fabric 4
18. Tacking Stitch - do not trim