M N
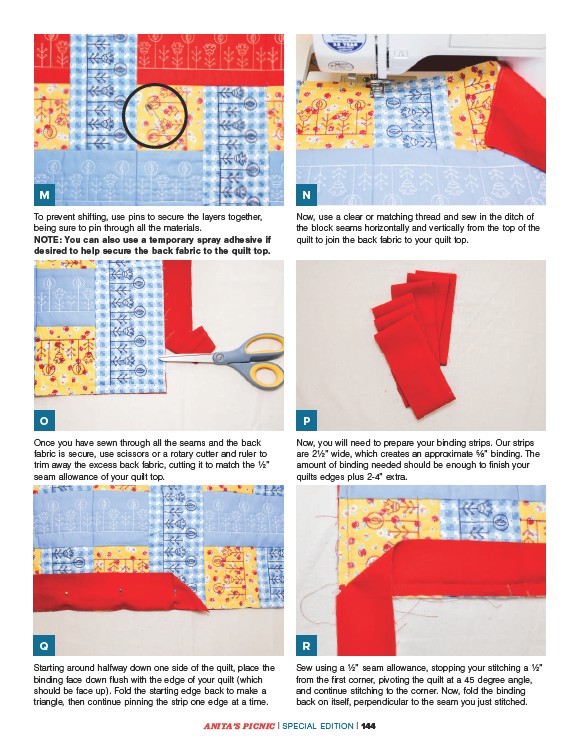
To prevent shifting, use pins to secure the layers together,
being sure to pin through all the materials.
NOTE: You can also use a temporary spray adhesive if
desired to help secure the back fabric to the quilt top.
O P
Once you have sewn through all the seams and the back
fabric is secure, use scissors or a rotary cutter and ruler to
trim away the excess back fabric, cutting it to match the ½”
seam allowance of your quilt top.
Q R
Starting around halfway down one side of the quilt, place the
binding face down flush with the edge of your quilt (which
should be face up). Fold the starting edge back to make a
triangle, then continue pinning the strip one edge at a time.
Now, use a clear or matching thread and sew in the ditch of
the block seams horizontally and vertically from the top of the
quilt to join the back fabric to your quilt top.
Now, you will need to prepare your binding strips. Our strips
are 2½” wide, which creates an approximate ⅝” binding. The
amount of binding needed should be enough to finish your
quilts edges plus 2-4” extra.
Sew using a ½” seam allowance, stopping your stitching a ½”
from the first corner, pivoting the quilt at a 45 degree angle,
and continue stitching to the corner. Now, fold the binding
back on itself, perpendicular to the seam you just stitched.
ANITA’S PICNIC | SPECIAL EDITION | 144