Accessories
KTI TRIPLE ACTING POWER UNIT (POWER UP/POWER DOWN/GRAVITY DOWN)
139
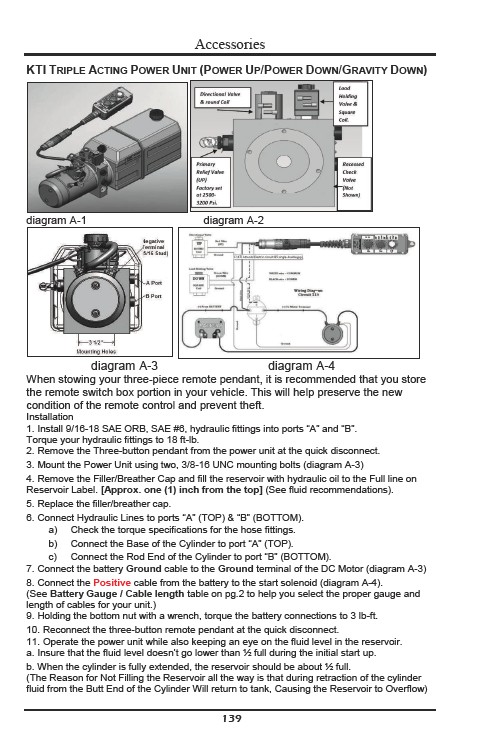
diagram A-1 diagram A-2
diagram A-3 diagram A-4
When stowing your three-piece remote pendant, it is recommended that you store
the remote switch box portion in your vehicle. This will help preserve the new
condition of the remote control and prevent theft.
Installation
1. Install 9/16-18 SAE ORB, SAE #6, hydraulic fittings into ports “A” and “B”.
Torque your hydraulic fittings to 18 ft-lb.
2. Remove the Three-button pendant from the power unit at the quick disconnect.
3. Mount the Power Unit using two, 3/8-16 UNC mounting bolts (diagram A-3)
4. Remove the Filler/Breather Cap and fill the reservoir with hydraulic oil to the Full line on
Reservoir Label. Approx. one (1) inch from the top (See fluid recommendations).
5. Replace the filler/breather cap.
6. Connect Hydraulic Lines to ports “A” (TOP) & “B” (BOTTOM).
a) Check the torque specifications for the hose fittings.
b) Connect the Base of the Cylinder to port “A” (TOP).
c) Connect the Rod End of the Cylinder to port “B” (BOTTOM).
7. Connect the battery Ground cable to the Ground terminal of the DC Motor (diagram A-3)
8. Connect the Positive cable from the battery to the start solenoid (diagram A-4).
(See Battery Gauge / Cable length table on pg.2 to help you select the proper gauge and
length of cables for your unit.)
9. Holding the bottom nut with a wrench, torque the battery connections to 3 lb-ft.
10. Reconnect the three-button remote pendant at the quick disconnect.
11. Operate the power unit while also keeping an eye on the fluid level in the reservoir.
a. Insure that the fluid level doesn’t go lower than ½ full during the initial start up.
b. When the cylinder is fully extended, the reservoir should be about ½ full.
(The Reason for Not Filling the Reservoir all the way is that during retraction of the cylinder
fluid from the Butt End of the Cylinder Will return to tank, Causing the Reservoir to Overflow)