51
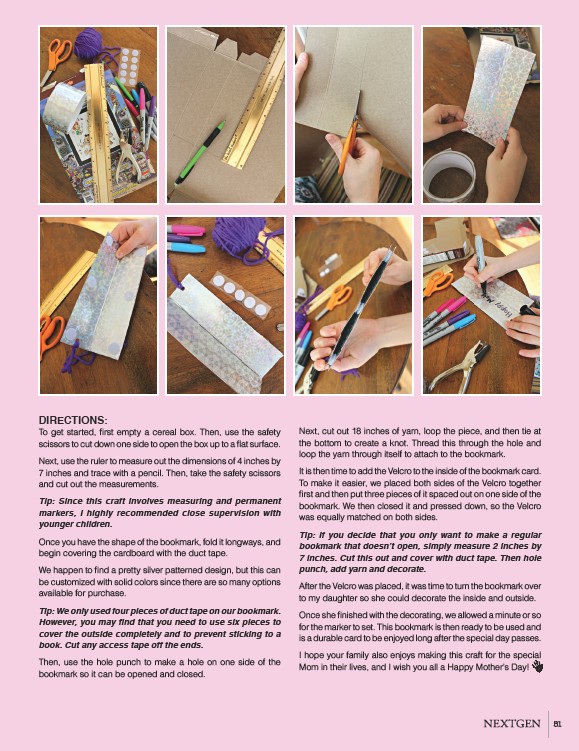
DIRECTIONS:
To get started, ��rst empty a cereal box. Then, use the safety
scissors to cut down one side to open the box up to a ��at surface.
Next, use the ruler to measure out the dimensions of �� inches by
�� inches and trace with a pencil. Then, take the safety scissors
and cut out the measurements.
Tip: Since this craft involves measuring and permanent
markers, I highly recommended close supervision with
younger children.
Once you have the shape of the bookmark, fold it longways, and
begin covering the cardboard with the duct tape.
We happen to ��nd a pretty silver patterned design, but this can
be customized with solid colors since there are so many options
available for purchase.
������������������������������������������������������������������������������������������������������������������������
����������������������������������������������������������������������������������������������������������������
cover the outside completely and to prevent sticking to a
������������������������������������������������������������������������������
Then, use the hole punch to make a hole on one side of the
bookmark so it can be opened and closed.
Next, cut out 18 inches of yarn, loop the piece, and then tie at
the bottom to create a knot. Thread this through the hole and
loop the yarn through itself to attach to the bookmark.
It is then time to add the ��elcro to the inside of the bookmark card.
To make it easier, we placed both sides of the ��elcro together
��rst and then put three pieces of it spaced out on one side of the
bookmark. We then closed it and pressed down, so the ��elcro
was equally matched on both sides.
Tip: If you decide that you only want to make a regular
��������������������������������������������������������������������������������������������������������������
7 inches. Cut this out and cover with duct tape. Then hole
punch, add yarn and decorate.
After the ��elcro was placed, it was time to turn the bookmark over
to my daughter so she could decorate the inside and outside.
Once she ��nished with the decorating, we allowed a minute or so
for the marker to set. This bookmark is then ready to be used and
is a durable card to be enjoyed long after the special day passes.
I hope your family also enjoys making this craft for the special
Mom in their lives, and I wish you all a Happy Mother’s Day!