Step 3- With the recorded measurements, verify with bar coded
label on cardboard box and paperwork to make sure the
size and order information is correct.
Step 4- Carefully cut straps, unpackage door and remove cardboard.
Step 5- Lay door flat down with exterior side down.
Step 6- Remove the shipping tape from sash and door.
Step 7- Remove glass and screen insert(s).
2 MEASURE FOR Z-BAR HEIGHT
If Eastern Z-Bar is ordered, a 1⁄4" spacer has been attached to rear side of z-bar. At
! installation, drill 1⁄8" holes through spacer using installation holes in z-bar as a guide.
3
1 MEASURE & INSTALL 1234567.001 1234567.001
*1234567.001*
ORDER SIZE: 32 x 80
901001 - PROVIA
MODEL: 397 FULL VIEW
PO #: PROVIA
JOB: PROVIA
PKUP 150
LOAD: 10/06
TAG#: BACK
SUGARCREEK
Quality Check
397-01 31 1/8 x 79 1/8
3
_____ screw covers
_____ screen
_____ TAG: BACK
_____ Right Hinged Pre-Hung
_____ Snow Mist White
_____ DH230 RH AB Contemporary Lever
_____ Prep Left for Handleset (Std 39”)
_____ DH305 White Hd Touch’hold Closer
2 STD SD1006A
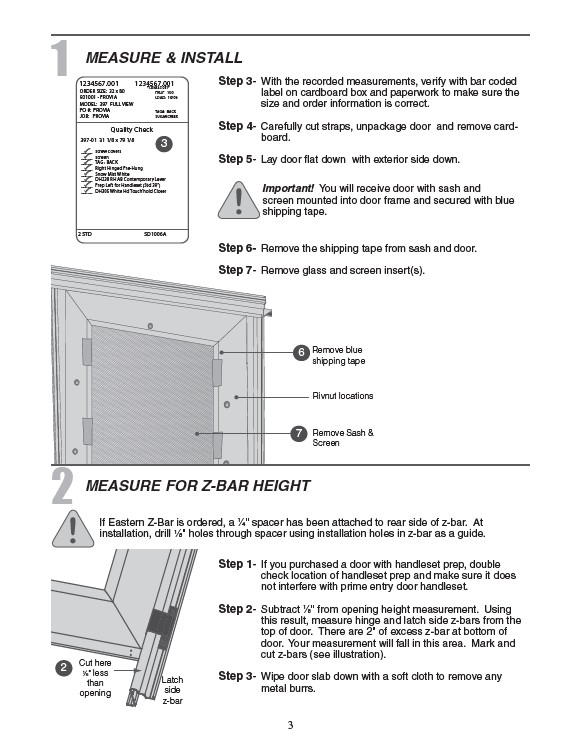
! Important! You will receive door with sash and
screen mounted into door frame and secured with blue
shipping tape.
6 Remove blue
shipping tape
Rivnut locations
7 Remove Sash &
Screen
Step 1- If you purchased a door with handleset prep, double
check location of handleset prep and make sure it does
not interfere with prime entry door handleset.
Step 2- Subtract 1⁄8" from opening height measurement. Using
this result, measure hinge and latch side z-bars from the
top of door. There are 2" of excess z-bar at bottom of
door. Your measurement will fall in this area. Mark and
cut z-bars (see illustration).
Step 3- Wipe door slab down with a soft cloth to remove any
metal burrs.
2 Cut here
1⁄8" less
than
opening
Latch
side
z-bar