1
2
1”
3
4
1 1⁄4”
Putting it Together
Once you have your two separate door decorations
completed, we wanted to take it a step further and
show you how to make a 2-in-1 display! Finish off
your welcome sign with a coordinating ribbon and
piece together your Dangler with some fun and
festive buttons. For this mini project, you’ll be taking
your two complimentary pieces and stitching them
together with clear thread to make a perfectly paired
decorative display.
You Will Need:
• Festive door dangler
• Seasonal welcome sign
• Monofilament thread
• Needle & marking pins
• Scissors
• Ruler
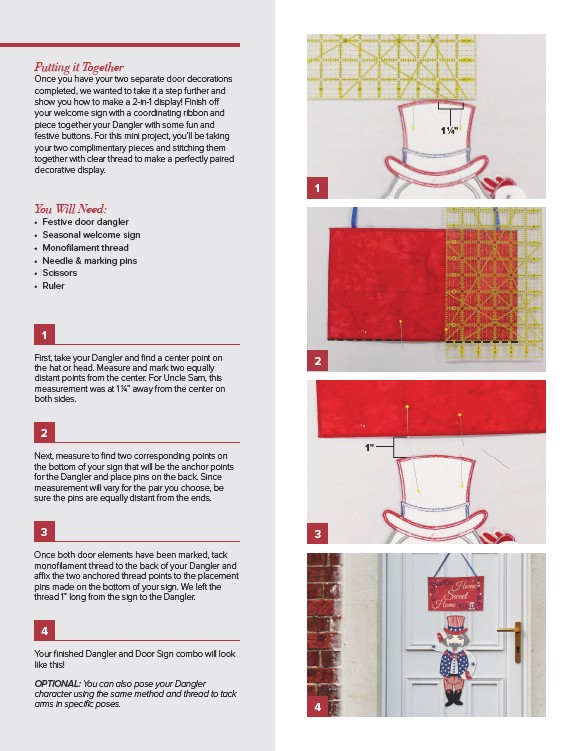
1
First, take your Dangler and find a center point on
the hat or head. Measure and mark two equally
distant points from the center. For Uncle Sam, this
measurement was at 1 1⁄4” away from the center on
both sides.
2
Next, measure to find two corresponding points on
the bottom of your sign that will be the anchor points
for the Dangler and place pins on the back. Since
measurement will vary for the pair you choose, be
sure the pins are equally distant from the ends.
3
Once both door elements have been marked, tack
monofilament thread to the back of your Dangler and
affix the two anchored thread points to the placement
pins made on the bottom of your sign. We left the
thread 1” long from the sign to the Dangler.
4
Your finished Dangler and Door Sign combo will look
like this!
OPTIONAL: You can also pose your Dangler
character using the same method and thread to tack
arms in specific poses.