MERGING THE DESIGNS
STEP-BY-STEP INSTRUCTIONS
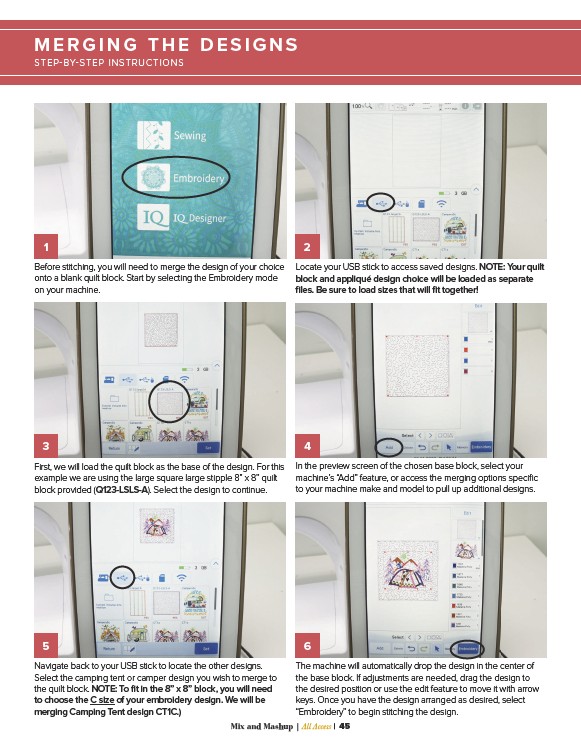
Before stitching, you will need to merge the design of your choice
onto a blank quilt block. Start by selecting the Embroidery mode
on your machine.
First, we will load the quilt block as the base of the design. For this
example we are using the large square large stipple 8” x 8” quilt
block provided (Q123-LSLS-A). Select the design to continue.
Locate your USB stick to access saved designs. NOTE: Your quilt
block and appliqué design choice will be loaded as separate
files. Be sure to load sizes that will fit together!
In the preview screen of the chosen base block, select your
machine’s “Add” feature, or access the merging options specific
to your machine make and model to pull up additional designs.
Navigate back to your USB stick to locate the other designs.
Select the camping tent or camper design you wish to merge to
the quilt block. NOTE: To fit in the 8” x 8” block, you will need
to choose the C size of your embroidery design. We will be
merging Camping Tent design CT1C.)
The machine will automatically drop the design in the center of
the base block. If adjustments are needed, drag the design to
the desired position or use the edit feature to move it with arrow
keys. Once you have the design arranged as desired, select
“Embroidery” to begin stitching the design.
Mix and Mashup | All Access | 45
1
3
5
2
4
6