Steps | All Access | 360
7. Tacking Stitch - then trim appliqué 2
HSSH8
AA Size - 2.3” x 9.0” (Stitches - 2660)
A Size - 2.0” x 7.7” (Stitches - 2316)
B Size - 1.7” x 6.7” (Stitches - 2063)
C Size - 1.5” x 5.8” (Stitches - 1808)
D Size - 1.2” x 4.7” (Stitches - 1538)
1. Squaring Stitch - then place batting
2. Tacking Stitch - then trim batting
3. Placement Stitch - then place appliqué 1
4. Tacking Stitch - then trim appliqué 1
5. Placement Stitch - then place appliqué 2
6. Folding Stitch - then fold appliqué 2
7. Tacking Stitch - then trim appliqué 2
8. Placement Stitch - then place appliqué 3
9. Folding Stitch - then fold appliqué 3
10. Tacking Stitch - then trim appliqué 3
11. Placement Stitch - then place appliqué 4
12. Folding Stitch - then fold appliqué 4
13. Tacking Stitch - then trim appliqué 4
14. Placement Stitch - then place appliqué 5
15. Folding Stitch - then fold appliqué 5
16. Tacking Stitch - then trim appliqué 5
17. Placement Stitch - then place appliqué 6
18. Folding Stitch - then fold appliqué 6
19. Tacking Stitch - then trim appliqué 6
20. Placement Stitch - then place appliqué 7
21. Folding Stitch - then fold appliqué 7
22. Tacking Stitch - then trim appliqué 7
23. Placement Stitch - then place appliqué 8
24. Folding Stitch - then fold appliqué 8
25. Tacking Stitch - then trim appliqué 8
HSSH9
AA Size - 2.3” x 2.3” (Stitches - 1013)
A Size - 1.9” x 1.9” (Stitches - 885)
B Size - 1.7” x 1.7” (Stitches - 796)
C Size - 1.5” x 1.5” (Stitches - 705)
D Size - 1.2” x 1.2” (Stitches - 606)
1. Squaring Stitch - then place batting
2. Tacking Stitch - then trim batting
3. Placement Stitch - then place appliqué 1
4. Tacking Stitch - then trim appliqué 1
5. Placement Stitch - then place appliqué 2
6. Folding Stitch - then fold appliqué 2
7. Tacking Stitch - then trim appliqué 2
8. Placement Stitch - then place appliqué 3
9. Folding Stitch - then fold appliqué 3
10. Tacking Stitch - then trim appliqué 3
11. Placement Stitch - then place appliqué 4
12. Folding Stitch - then fold appliqué 4
13. Tacking Stitch - then trim appliqué 4
HSSH10
AA Size - 2.3” x 9.0” (Stitches - 3107)
A Size - 1.9” x 7.7” (Stitches - 2694)
B Size - 1.7” x 6.7” (Stitches - 2380)
C Size - 1.5” x 5.8” (Stitches - 2113)
D Size - 1.2” x 4.7” (Stitches - 1790)
1. Squaring Stitch - then place batting
2. Tacking Stitch - then trim batting
3. Placement Stitch - then place appliqué 1
4. Tacking Stitch - then trim appliqué 1
5. Placement Stitch - then place appliqué 2
6. Folding Stitch - then fold appliqué 2
7. Tacking Stitch - then trim appliqué 2
8. Placement Stitch - then place appliqué 3
9. Folding Stitch - then fold appliqué 3
10. Tacking Stitch - then trim appliqué 3
11. Placement Stitch - then place appliqué 4
12. Folding Stitch - then fold appliqué 4
13. Tacking Stitch - then trim appliqué 4
14. Placement Stitch - then place appliqué 5
15. Folding Stitch - then fold appliqué 5
16. Tacking Stitch - then trim appliqué 5
17. Placement Stitch - then place appliqué 6
18. Folding Stitch - then fold appliqué 6
19. Tacking Stitch - then trim appliqué 6
20. Placement Stitch - then place appliqué 7
21. Folding Stitch - then fold appliqué 7
22. Tacking Stitch - then trim appliqué 7
23. Placement Stitch - then place appliqué 8
24. Folding Stitch - then fold appliqué 8
25. Tacking Stitch - then trim appliqué 8
26. Placement Stitch - then place appliqué 9
27. Folding Stitch - then fold appliqué 9
28. Tacking Stitch - then trim appliqué 9
29. Placement Stitch - then place appliqué 10
30. Folding Stitch - then fold appliqué 10
31. Tacking Stitch - then trim appliqué 10
HSSH11
AA Size - 4.5” x 4.5” (Stitches - 1352)
A Size - 3.9” x 3.9” (Stitches - 1160)
B Size - 3.4” x 3.4” (Stitches - 1026)
C Size - 2.9” x 2.9” (Stitches - 887)
D Size - 2.4” x 2.4” (Stitches - 736)
1. Squaring Stitch - then place batting
2. Tacking Stitch - then trim batting
3. Placement Stitch - then place appliqué 1
4. Tacking Stitch - then trim appliqué 1
5. Placement Stitch - then place appliqué 2
6. Folding Stitch - then fold appliqué 2
7. Tacking Stitch - then trim appliqué 2
HSSH12
AA Size - 4.5” x 9.0” (Stitches - 2511)
A Size - 3.9” x 7.7” (Stitches - 2158)
B Size - 3.4” x 6.7” (Stitches - 1886)
C Size - 2.9” x 5.8” (Stitches - 1636)
D Size - 2.4” x 4.7” (Stitches - 1353)
1. Squaring Stitch - then place batting
2. Tacking Stitch - then trim batting
3. Placement Stitch - then place appliqué 1
4. Tacking Stitch - then trim appliqué 1
5. Placement Stitch - then place appliqué 2
6. Folding Stitch - then fold appliqué 2
7. Tacking Stitch - then trim appliqué 2
8. Placement Stitch - then place appliqué 3
9. Folding Stitch - then fold appliqué 3
10. Tacking Stitch - then trim appliqué 3
11. Placement Stitch - then place appliqué 4
12. Folding Stitch - then fold appliqué 4
13. Tacking Stitch - then trim appliqué 4
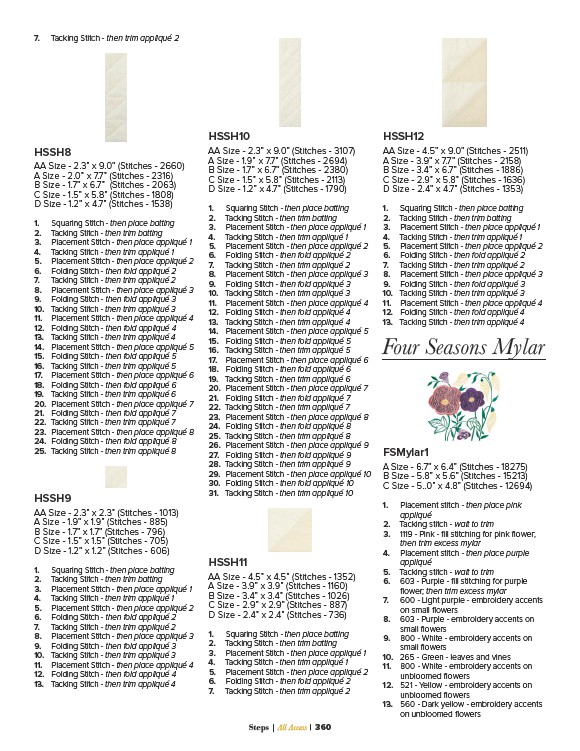
Four Seasons Mylar
FSMylar1
A Size - 6.7” x 6.4” (Stitches - 18275)
B Size - 5.8” x 5.6” (Stitches - 15213)
C Size - 5..0” x 4.8” (Stitches - 12694)
1. Placement stitch - then place pink
appliqué
2. Tacking stitch - wait to trim
3. 1119 - Pink - fill stitching for pink flower;
then trim excess mylar
4. Placement stitch - then place purple
appliqué
5. Tacking stitch - wait to trim
6. 603 - Purple - fill stitching for purple
flower; then trim excess mylar
7. 600 - Light purple - embroidery accents
on small flowers
8. 603 - Purple - embroidery accents on
small flowers
9. 800 - White - embroidery accents on
small flowers
10. 265 - Green - leaves and vines
11. 800 - White - embroidery accents on
unbloomed flowers
12. 521 - Yellow - embroidery accents on
unbloomed flowers
13. 560 - Dark yellow - embroidery accents
on unbloomed flowers