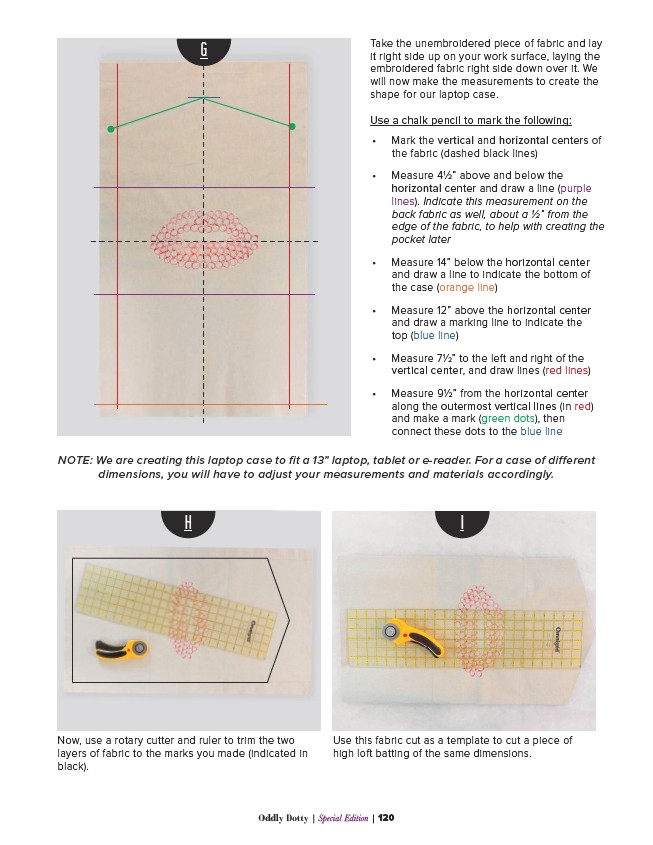
Take the unembroidered piece of fabric and lay
it right side up on your work surface, laying the
embroidered fabric right side down over it. We
will now make the measurements to create the
shape for our laptop case.
Use a chalk pencil to mark the following:
• Mark the vertical and horizontal centers of
the fabric (dashed black lines)
• Measure 41⁄2” above and below the
horizontal center and draw a line (purple
lines). Indicate this measurement on the
back fabric as well, about a 1⁄2” from the
edge of the fabric, to help with creating the
pocket later
• Measure 14” below the horizontal center
and draw a line to indicate the bottom of
the case (orange line)
• Measure 12” above the horizontal center
and draw a marking line to indicate the
top (blue line)
• Measure 71⁄2” to the left and right of the
vertical center, and draw lines (red lines)
• Measure 91⁄2” from the horizontal center
along the outermost vertical lines (in red)
and make a mark (green dots), then
connect these dots to the blue line
NOTE: We are creating this laptop case to fit a 13” laptop, tablet or e-reader. For a case of different
dimensions, you will have to adjust your measurements and materials accordingly.
Oddly Dotty | Special Edition | 120
G
H I
Now, use a rotary cutter and ruler to trim the two
layers of fabric to the marks you made (indicated in
black).
Use this fabric cut as a template to cut a piece of
high loft batting of the same dimensions.