Step 5. When tied correctly, the working
end will lead off the cleat in the opposite
direction of the bitter end.
When tied properly, it will be easy
to release under load. Under normal circumstances
it is sufficient to hold a boat
to a dock. You can finish off with two halfhitches
when tying off in exposed areas or
where strong winds, currents, or surges are
likely.
THE BOWLINE (BOH’-LIN)
The bowline is a versatile knot that forms
a secure loop in the end of a line. It has
many uses on a boat. It has the advantage
of not jamming, compared to some other
loop-forming knots. With practice it is easy
to tie and untie and will not slip or jam—all
of the characteristics of a good knot.
Use this knot to:
• Form a secure loop in the end of a mooring
line to place over a cleat or post.
• Tie a line to a fitting, such as an anchor or
mooring ring.
Section 16: Knots and Lines 179
• Tie together lines of the same or different
diameter, using a bowline at the end
of each line.
• Form a free-running noose by passing
a portion of the line through a bowline
loop.
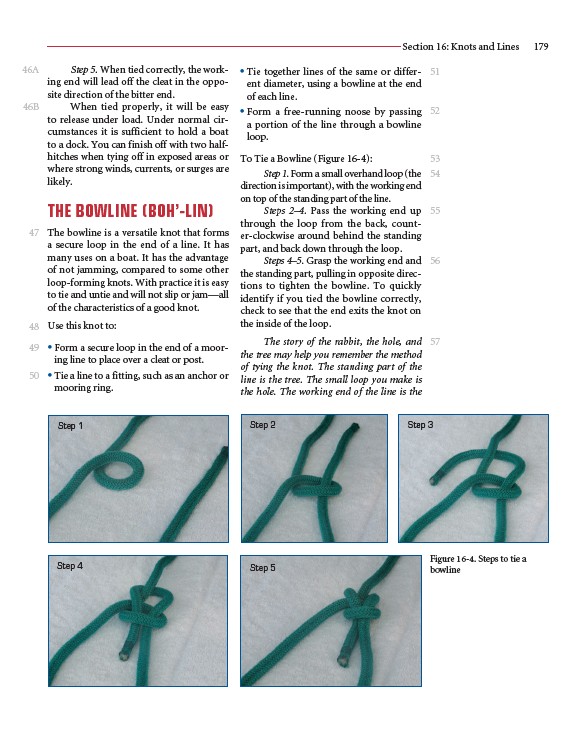
To Tie a Bowline (Figure 16-4):
Step 1. Form a small overhand loop (the
direction is important), with the working end
on top of the standing part of the line.
Steps 2–4. Pass the working end up
through the loop from the back, counter
clockwise around behind the standing
part, and back down through the loop.
Steps 4–5. Grasp the working end and
the standing part, pulling in opposite directions
to tighten the bowline. To quickly
identify if you tied the bowline correctly,
check to see that the end exits the knot on
the inside of the loop.
The story of the rabbit, the hole, and
the tree may help you remember the method
of tying the knot. The standing part of the
line is the tree. The small loop you make is
the hole. The working end of the line is the
46A
46B
47
48
49
50
51
52
53
54
55
56
57
Step 1
Step 2
Step 3
Step 4
Step 5
Figure 16-4. Steps to tie a
bowline