You will use your course plotter to make
these measurements.
Distance is measured using the dividers.
If the distance is short enough, you can
span the entire course line with the dividers
(Figure 17-18a, b). If the line is too long
you will need to use another technique,
explained below (Figure 17-24a, b, c, d).
Skill—Draw and Measure Course
Lines and Distances
This skill will allow you to draw a course
line, determine a course to steer, and measure
distances. You will need a USPS course
plotter (see Figure 17-10), your dividers,
and the blank chart sample in this student
guide.
The USPS course plotter has a protractor
like scale of degrees. Actually it has four
scales. While this may seem daunting at first,
it is really quite easy to use. You will be using
the grid lines for reference and for choosing
which scale to read based on which grid line
you are using and which way you tilt the
plotter. We will show you step-by-step how
to do it. You also can follow along on Figures
17-19a and 17-19b, 17-20, and 17-21
while you execute the following steps.
Using the USPS Plotter
This plotter is versatile and is simple to use.
These instructions provide you with the
basics.
Drawing a Course Line
If you want to draw a course line with a
specific heading follow these directions.
You will use either of the grid lines (meridians
or parallels) for reference.
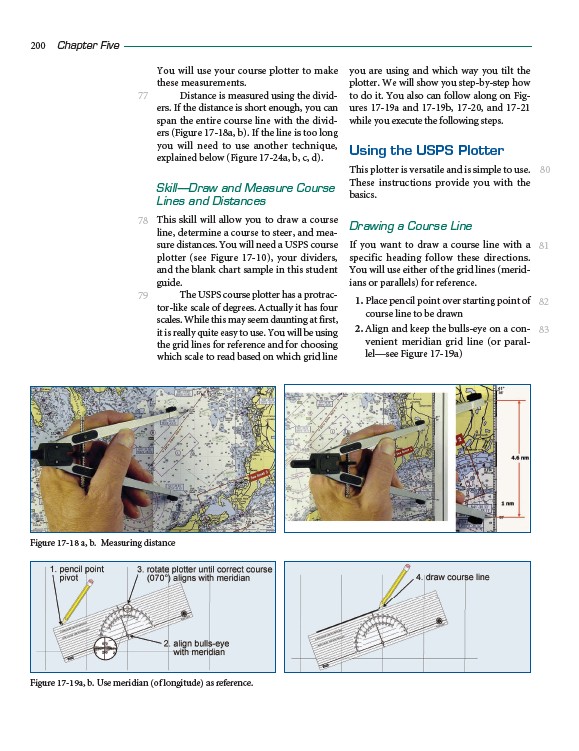
1. Place pencil point over starting point of
course line to be drawn
2. Align and keep the bulls-eye on a convenient
meridian grid line (or parallel—
see Figure 17-19a)
200 Chapter Five
77
78
79
81
82
83
Figure 17-18 a, b. Measuring distance
Figure 17-19a, b. Use meridian (of longitude) as reference.
80