246
FINISHING YOUR QUILT - STEP BY STEP
M N
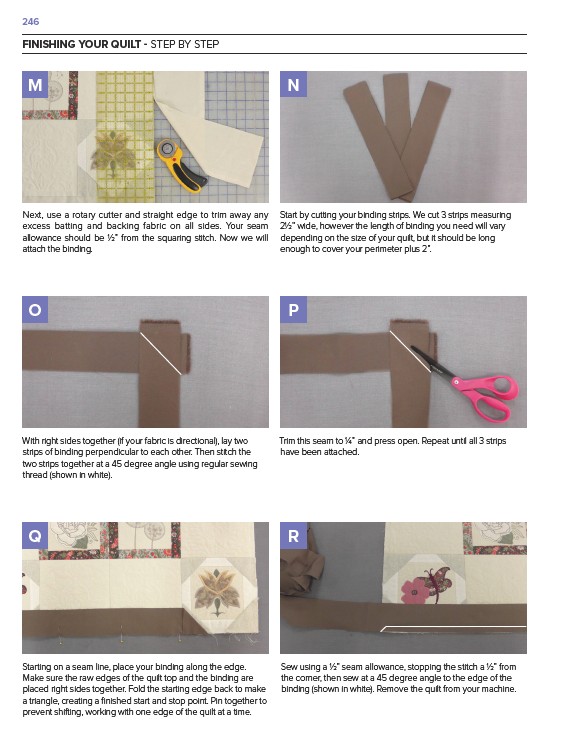
Sew using a ½” seam allowance, stopping the stitch a ½” from
the corner, then sew at a 45 degree angle to the edge of the
binding (shown in white). Remove the quilt from your machine.
O
Starting on a seam line, place your binding along the edge.
Make sure the raw edges of the quilt top and the binding are
placed right sides together. Fold the starting edge back to make
a triangle, creating a finished start and stop point. Pin together to
prevent shifting, working with one edge of the quilt at a time.
Start by cutting your binding strips. We cut 3 strips measuring
2½” wide, however the length of binding you need will vary
depending on the size of your quilt, but it should be long
enough to cover your perimeter plus 2”.
Next, use a rotary cutter and straight edge to trim away any
excess batting and backing fabric on all sides. Your seam
allowance should be ½” from the squaring stitch. Now we will
attach the binding.
Trim this seam to ¼” and press open. Repeat until all 3 strips
have been attached.
With right sides together (if your fabric is directional), lay two
strips of binding perpendicular to each other. Then stitch the
two strips together at a 45 degree angle using regular sewing
thread (shown in white).
Q
P
R