Step-by-Step
MERGING instructions
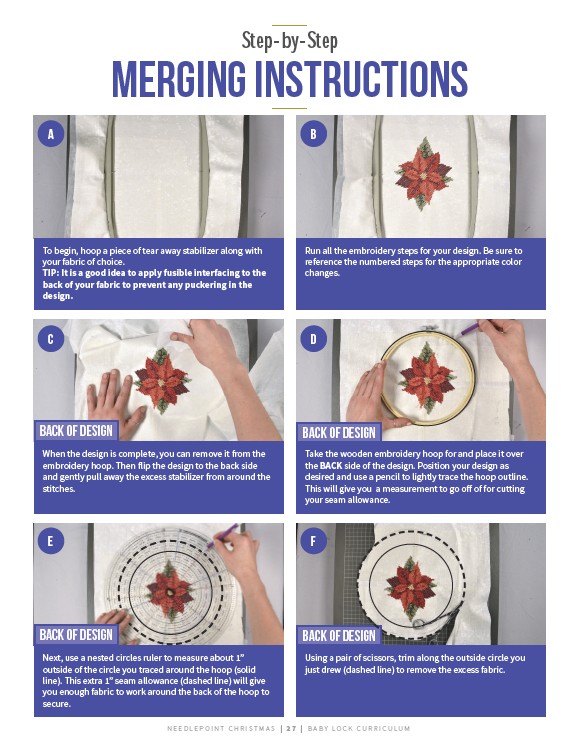
To begin, hoop a piece of tear away stabilizer along with
your fabric of choice.
TIP: It is a good idea to apply fusible interfacing to the
back of your fabric to prevent any puckering in the
design.
Run all the embroidery steps for your design. Be sure to
reference the numbered steps for the appropriate color
changes.
Back of Design Back of Design
When the design is complete, you can remove it from the
embroidery hoop. Then flip the design to the back side
and gently pull away the excess stabilizer from around the
stitches.
Take the wooden embroidery hoop for and place it over
the BACK side of the design. Position your design as
desired and use a pencil to lightly trace the hoop outline.
This will give you a measurement to go off of for cutting
your seam allowance.
Next, use a nested circles ruler to measure about 1”
outside of the circle you traced around the hoop (solid
line). This extra 1” seam allowance (dashed line) will give
you enough fabric to work around the back of the hoop to
secure.
Using a pair of scissors, trim along the outside circle you
just drew (dashed line) to remove the excess fabric.
N E E D L E P O I N T C H R I STMAS | 2 7 | BABY LO C K CU R R I CULUM
a
c
e
b
d
f
Back of Design Back of Design